I just got finished moving back to the US from Japan, and I’ve come to rely on my homelab for essentials (Git, Cryptpad, File Sharing, Immich, etc.) Of course, I can’t go without these so I set about migrating my homelab to the cloud!
Some background
Linode is a cloud provider I’ve been using for years, so I went with them.
If you check out my other post about the services that I run, migrating everything would be ungodly expensive (<$1000 per month), so I only went with the absolute essentials. Namely, Calibre, Cryptpad, Gitea, Immich, my workout tracker (GainSmith) and Linkwarden.
With this, I’m looking at a monthly bill of $70 which is pretty reasonable. My server should be arriving soon anyway so this will be temporary.
I back up all of my containers via Proxmox, and the nice thing about that is container backups are just snapshots of the file system. This means that to get all of my data migrated to the cloud, all I need to do is decompress the backup, and move over the necessary files.
I won’t go over every service as they all have their own quirks but the gist goes something like this:
Use Terraform to provision the necessary cloud VM’s, firewalls, and VPCs -> Use Ansible to pull the data from Linode Object Storage, and bootstrap the VMs -> ??? -> Profit!!!
Infrastructure Overview
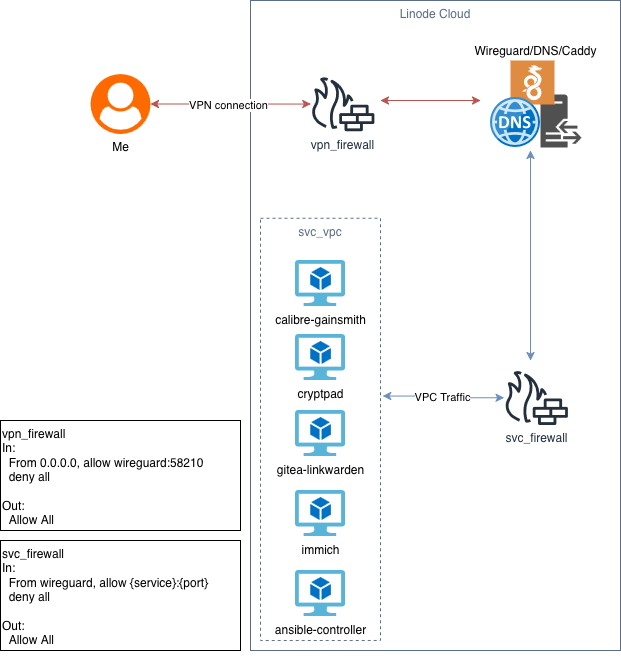
So it’s pretty simple.
I have a VPN Server/Caddy/DNS server exposed to the internet, only accepting VPN connections from the internet. This would also handle all of our reverse proxy connections and DNS requests.
We then have our ‘svc_vpc’ to handle all inter-VM traffic. With this, we also do not give any of the VMs a public IP address, but they can still connect to the internet via a NAT connection. In addition, the firewall only accepts the requisite port connections from the Caddy server.
Finally, we have our ‘ansible_controller’ to handle the configuration of the VMs, but we will delete this after we’re done to save money.
I’m sure you’ve noticed that I’ve doubled up on some of the services, this is merely to save on cost. The ones that are doubled up do not take enough compute to warrant their own VM.
Setting Everything Up With Terraform
This is my first time using Terraform for this kind of project with data I somewhat care about. Looking back, I wish I used something like Pulumi, but too late. Maybe I’ll use it for Proxmox in the future.
If you’re not familiar with Terraform, it’s an IaC tool that can be used to declaritively create infrastructure from code. It’s create for tracking the state of your infrastructure, so if something needs to exist, it will create it, and it can smartly detect if it needs to modify existing resources accordingly.
Of course, Terraform allows for secret management so no free API keys for you.
Here’s an example for my Cryptpad instance:
cryptpad.tf
resource "linode_instance" "cryptpad-us-lax" {
  label  = "cryptpad-us-lax"
  image  = "linode/centos-stream9"
  region = var.region
  type   = "g6-standard-1"
  interface {
    purpose   = "vpc"
    subnet_id = linode_vpc_subnet.svc-net.id
    ipv4 {
      nat_1_1 = "any"
      vpc     = "${var.network_id}.10"
    }
  }
  authorized_users = ["gloof"]
  root_pass        = var.root_pass
  private_ip       = false
As you can see, we can define the name of our VM, image, region, type, it’s assigned VPC, whether it’s a NAT connection, the SSH keys that Linode will pass to the machine, and it’s root password.
You can even define your secrets and variables within another file and use them within resources such as with ‘var.root_pass’.
The most interesting one is the file for Ansible:
ansible.tf
resource "linode_instance" "ansible-us-lax" {
  label          = "ansible-us-lax"
  image          = "linode/ubuntu22.04"
  region         = var.region
  type           = "g6-nanode-1"
  stackscript_id = "1242617"

  interface {
    purpose   = "vpc"
    subnet_id = linode_vpc_subnet.svc-net.id
    ipv4 {
      nat_1_1 = "any"
      vpc     = "${var.network_id}.200"
    }
  }
  authorized_users = ["gloof"]
  root_pass        = var.root_pass
  private_ip       = false
  metadata {
    user_data = base64encode(local.user_data)
  }
}

locals {
  user_data = <<EOT
  #cloud-config
  runcmd:
    # Get the repo
    - mkdir /run/mydir
    - echo '${var.private_key}' | base64 -d > /run/mydir/id_rsa
    - [ wget, '${var.git_repo_object}', -O, /run/mydir/repo.tar.gz ]
    - [ tar, -xzf, /run/mydir/repo.tar.gz, -C, /root ]
    - [ mv, /run/mydir/id_rsa, /root/.ssh/id_rsa ]
    - [ chmod, 600, /root/.ssh/id_rsa ]
  EOT
}
For starters, I used a StackScript so I don’t need to setup Ansible on my own because I’m lazy.
Another thing you may see is that I’ve passed through ‘user_data’. User data is simply commands that will be run once automatically when the VM is instantiated. This only runs once.
Because I don’t expose my repo on a platform like GitHub (It’s hosted on my personal Git Server), I can’t do a simple git clone to pull down my repo, so I tar’d my repo, put it on Object Storage, and generated a one-time use link to download the repo! It’s very hacky, and in production you would not want to do this. Preferably you would want to authenticate with a Git server to pull this down programatically, but for a one shot case like this, this will do.
Finishing it off with Ansible
Finally, I used Ansible to bootstrap all of the VM’s and pull down the data.
A crucial part of my playbooks is my vars.yml. In there I have each one of the links to the backups in object storage mapped to each VM, and then each service within said VM.
Each playbook is a bit different but each of them have the same tasks within them. Here’s a snippet from the gitea/linkwarden playbook:
- name: Provision Gitea & Linkwarden
  hosts: gitea-linkwarden
  become: true

  tasks:
    - name: Include variables
      ansible.builtin.include_vars: vars.yml

    - name: Install packages
      ansible.builtin.dnf:
        name:
          - tar
          - zstd
          - wget
          - git
        state: present

    - name: Create temp directories for data
      ansible.builtin.file:
        path: "/tmp/"
        state: directory
        mode: '0755'
      loop:
        - gitea
        - linkwarden

    - name: Download the data from obj storage
      ansible.builtin.get_url:
        url: ""
        dest: "/tmp//.tar.zst"
        mode: '0600'
      loop: ""

    - name: Provision Gitea
      block:
        - name: Create the gloof user
          ansible.builtin.user:
            name: gloof

        - name: Ensure the data directory exists
          ansible.builtin.file:
            path: "/data"
            state: directory
            mode: '0755'

        - name: Extract the data into the directories
          ansible.builtin.unarchive:
            src: /tmp/gitea/gitea.tar.zst
            dest: /tmp/gitea
            include:
              - ./data/gitea/
            remote_src: true

        - name: Move the data folder
          ansible.builtin.copy:
            src: /tmp/gitea/data
            dest: /
            mode: '0755'
            remote_src: true

        - name: Set the owners of git & gitea to gloof
          ansible.builtin.file:
            path: "/data/gitea/"
            owner: gloof
            group: gloof
          loop:
            - "git"
            - "gitea"

        - name: Add the docker compose for the instance
          ansible.builtin.copy:
            src: ../composefiles/gitea-docker-compose.yml
            dest: /opt/docker-compose.yml
            mode: '0600'

        - name: Start the container
          community.docker.docker_compose_v2:
            project_src: /opt
            state: present

    - name: Provision Linkwarden
      block:
        - name: Clone Linkwarden Repo
          ansible.builtin.git:
            repo: 'https://github.com/linkwarden/linkwarden.git'
            dest: /opt/linkwarden
            version: main

        - name: Ensure the data directory exists
          ansible.builtin.file:
            path: "/opt/linkwarden/data"
            state: directory
            mode: '0755'

        - name: Extract the data into the directories
          ansible.builtin.unarchive:
            src: /tmp/linkwarden/linkwarden.tar.zst
            dest: /tmp/linkwarden
            include:
              - ./opt/linkwarden/data
            remote_src: true

        - name: Move the data folder
          ansible.builtin.copy:
            src: /tmp/gitea/data
            dest: /opt/linkwarden
            mode: '0755'
            remote_src: true

        - name: Add the .env file
          ansible.builtin.copy:
            src: linkwarden-env.env
            dest: /opt/linkwarden/.env
            mode: '0644'

        - name: Start the container
          community.docker.docker_compose_v2:
            project_src: /opt/linkwarden
            state: present

    - name: Clean Up the data folders
      ansible.builtin.file:
        path: "/tmp/"
        state: absent
        mode: '0755'
      loop:
        - gitea
        - linkwarden
In Closing
Doing this for all of my services took about 2 hrs. The one that took the longest time was Immich, simply because I have more than 50 GB of photos. I hope this article gave some insight into how to do your own cloud migrations! I will post another article going over moving things back on-prem, maybe with Pulumi this time 👀